Step-by-Step Bio Septic Tank Installation Process – What to Expect
Installing a bio septic tank is a critical investment for residential, commercial, and industrial properties that aim for sustainable and compliant wastewater management. Unlike conventional septic systems, bio septic tanks use advanced biological treatment to break down waste efficiently, reduce environmental impact, and minimize long-term maintenance.
For property owners, one of the most common concerns is understanding the installation process—what happens, how long it takes, and what responsibilities lie with the owner versus the service provider. This detailed guide explains the step-by-step installation process of a bio septic tank, helping you plan with clarity and confidence.
Step 1: Initial Consultation and Requirement Analysis
The installation process begins with a professional consultation. This stage is crucial because every property has unique wastewater requirements.
Key factors assessed during consultation:
- Type of property (independent house, apartment, hotel, hospital, factory, school)
- Number of users or daily wastewater load
- Available space for installation
- Soil conditions and groundwater level
- Local regulatory requirements
At this stage, Crystal Bio experts recommend the right tank capacity and model based on usage, ensuring optimal performance and regulatory compliance.
Step 2: Site Inspection and Technical Survey
Once the requirements are defined, a detailed site inspection is conducted.
What happens during the site survey:
- Measurement of available installation area
- Identification of inlet and outlet plumbing points
- Assessment of soil bearing capacity
- Evaluation of accessibility for machinery and transport
- Determination of excavation depth and orientation
This technical assessment ensures that the system can be installed safely and efficiently without disrupting existing structures or utilities.
Step 3: Design Finalization and System Customization
Based on the survey findings, the bio septic tank system is customized to suit the property’s needs.
Design considerations include:
- Tank size and treatment stages
- Flow direction and pipe layout
- Provision for future expansion
- Treated water outlet usage (soak pit, gardening, flushing reuse)
Crystal Bio systems are designed to function with gravity flow, reducing power dependency and operational costs.
Step 4: Approvals and Regulatory Compliance (If Required)
For commercial and large residential projects, approvals may be required from:
- Local municipal authorities
- Pollution Control Board (TNPCB or equivalent)
- Project consultants or architects
The installation partner assists in ensuring the system design complies with environmental norms and sanitation standards. This step is especially important for hotels, hospitals, and industries.
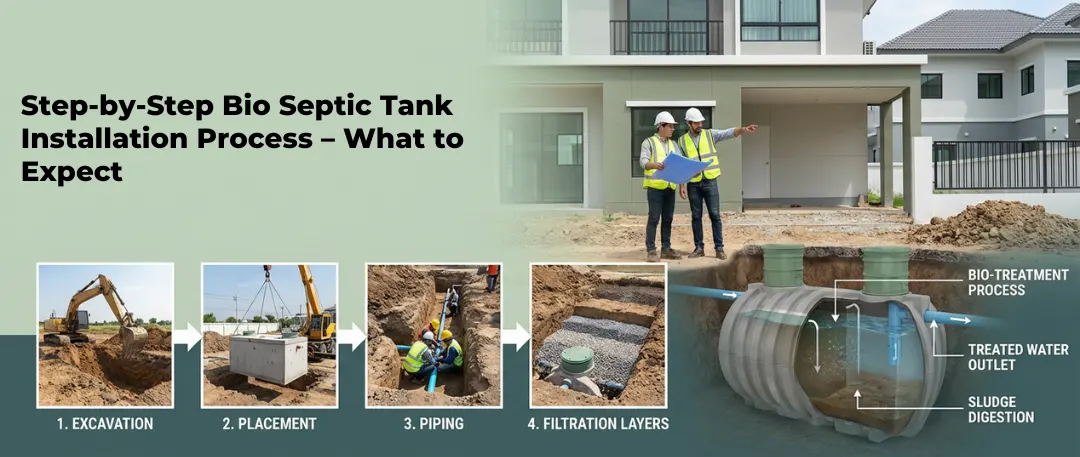
Step 5: Excavation and Foundation Preparation
After approvals and design finalization, excavation work begins.
Key activities in this stage:
- Excavation as per tank dimensions
- Leveling and compacting the base
- Laying PCC (Plain Cement Concrete) or sand bedding
- Ensuring correct slope for inlet and outlet pipes
Proper foundation preparation is essential to prevent tank settlement, leakage, or long-term structural issues.
Step 6: Placement of Bio Septic Tank
The prefabricated bio septic tank is transported to the site and carefully placed into the excavation pit.
Important aspects during placement:
- Correct alignment with inlet and outlet lines
- Level positioning to ensure smooth flow
- Structural safety during lowering
- Protection of tank walls from impact
Crystal Bio tanks are manufactured using high-quality materials that ensure durability, corrosion resistance, and long service life.
Step 7: Plumbing and Pipe Connections
Once the tank is positioned, plumbing connections are installed.
Connections include:
- Inlet pipe from toilets and wastewater sources
- Outlet pipe for treated water discharge
- Vent pipe for gas release
- Inspection and access chambers
All joints are sealed properly to prevent leakage and ensure efficient waste flow into the treatment system.
Step 8: Media Installation and Internal Setup
The bio media inside the tank plays a critical role in wastewater treatment.
What this step includes:
- Installation of anaerobic and bio-reactor media
- Activation of bacterial treatment environment
- Verification of internal compartments
These biological media support the growth of beneficial microorganisms that break down organic waste naturally and efficiently.
Step 9: Backfilling and Surface Restoration
After plumbing and internal setup, the excavation pit is backfilled.
Backfilling process:
- Layer-by-layer filling with excavated soil or sand
- Compaction to avoid future soil settlement
- Restoration of surface area (cementing, landscaping, or paving)
This step ensures the installation area remains stable and visually neat.
Step 10: System Testing and Commissioning
Before the system is handed over, testing and commissioning are carried out.
Testing includes:
- Checking inlet and outlet flow
- Inspecting for leaks
- Ensuring proper gas venting
- Verifying treated water clarity and odor levels
Only after successful testing is the system approved for regular use.
Why Professional Installation Matters
Installing a bio septic tank is not just about placing a tank underground. It involves technical precision, environmental compliance, and biological treatment knowledge. Professional installation ensures:
- Maximum treatment efficiency
- Compliance with regulations
- Long-term cost savings
- Reduced risk of failures or blockages
Conclusion
Understanding the installation process of a bio septic tank helps property owners make informed decisions and avoid unnecessary concerns. From consultation and design to commissioning and support, each step plays a vital role in ensuring efficient wastewater treatment and environmental protection.
A professionally installed bio septic system is a long-term asset—offering sustainability, cost savings, and peace of mind for years to come.
1 Can a bio septic tank be installed in an existing building?
2 Does the system require electricity?
3 How much space is required for installation?
Space requirements depend on tank capacity. Compact models are available for limited spaces.
4 Is excavation mandatory?
5 How often does the tank need cleaning?
Bio septic tanks require far less cleaning than traditional septic tanks. In many cases, desludging is needed only once in several years.